Showing posts with label Decorating. Show all posts

November 20, 2013

DIY: Reupholstering Dining Chairs

Several years ago, an extremely kind coworker gave me her dining set. She was moving and gaveit to me practically brand new, refusing any payment, knowing that I could never afford a set as nice as this. I believe she knew the mere pennies I would be taking home as a new teacher and I think she felt a little sorry for me. Anyway, Susan, if you're reading this, thank you so much for the dining set! You can't even begin to know how many fun times have been had around this table.  

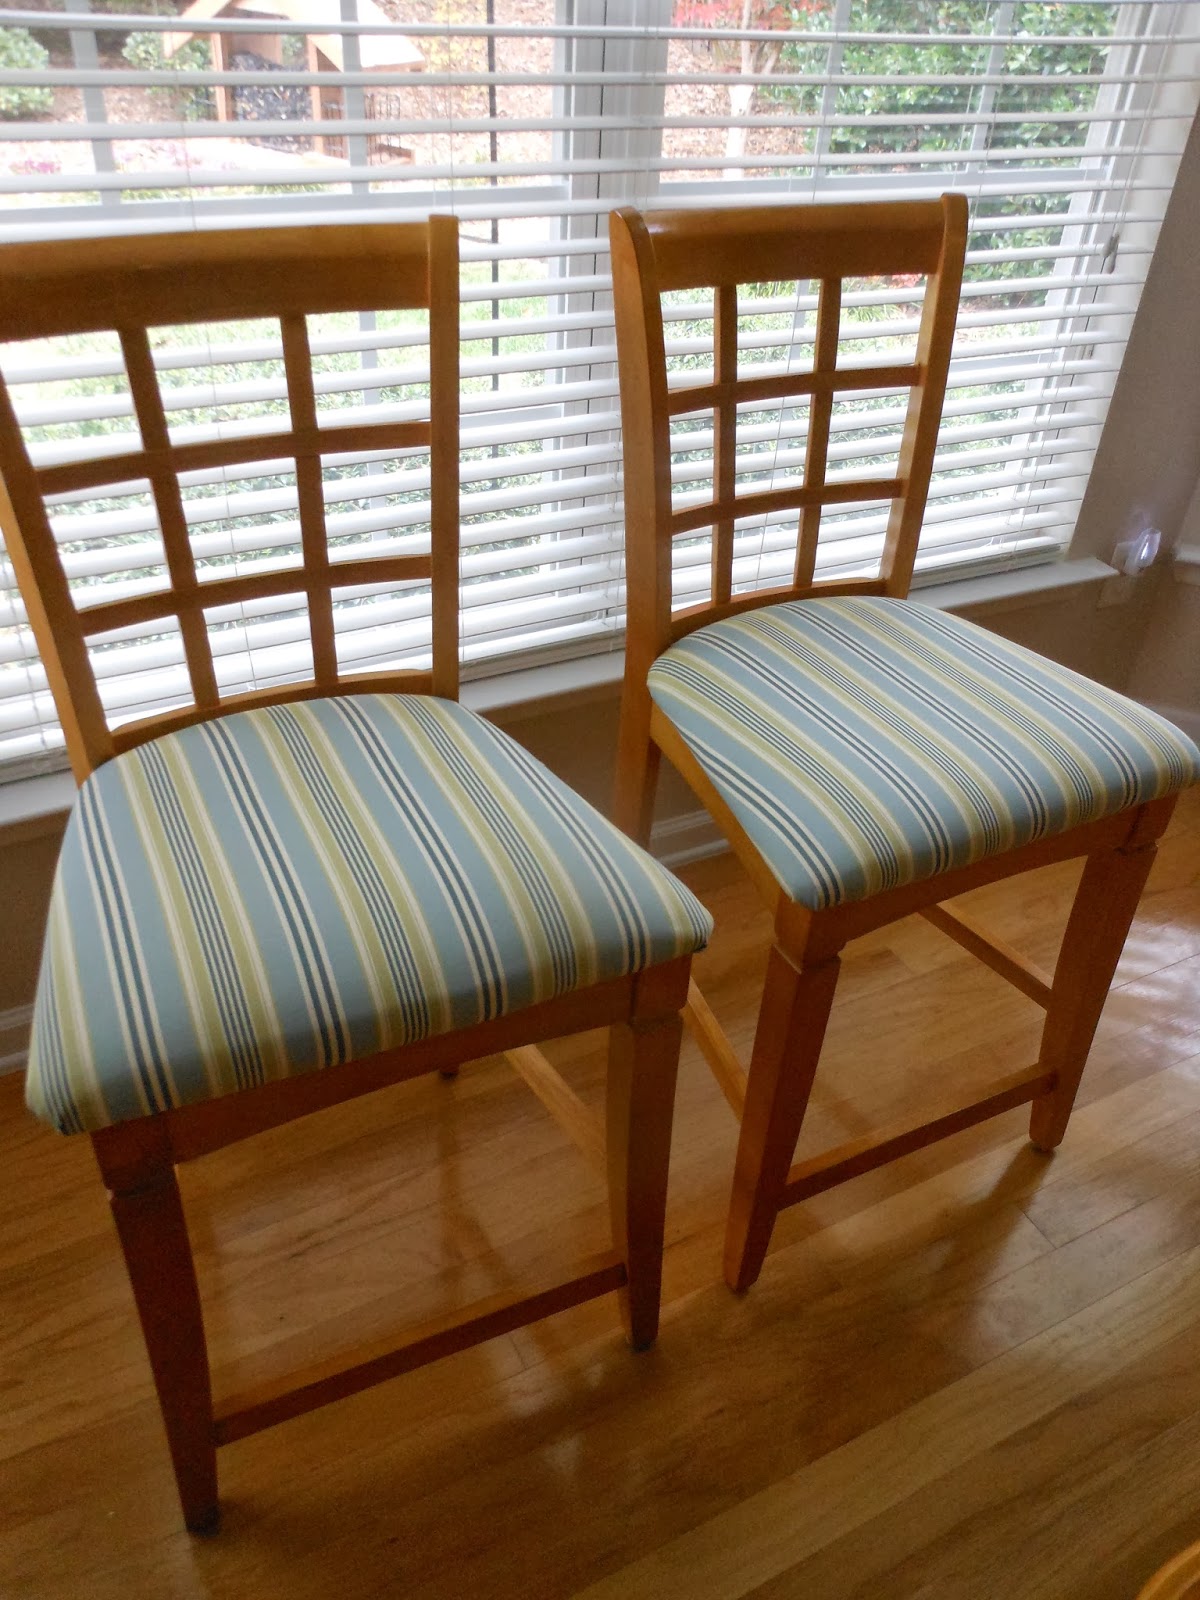
Alas, the upholstered chairs are starting to show some wear. We had them professionally cleaned last year, but it didn't really do much good. They were ripe for some fresh upholstery. I finally got around to tackling the job a few weeks ago. 

You can see the original, white upholstery on the left and the new upholstery on the right. 
I chose a colored, striped fabric for a few reasons: (1) it's durable, (2) it'll help camouflage minor stains,  (3) it matches the color scheme in my dining area, and (4) it was on sale.

See? These chairs have seen better days. It was starting to be just plain embarrassing.

To do this project I used the following tools, compliments of my husband: both types of screwdrivers, a staple gun, extra staples, a staple remover (which wasn't as effective as the flat-head screwdriver), scissors, and a hammer. Oh, and the fabric, too.  I bought 3 yards, but ended up using only half of it for 4 chairs.

I measured how much fabric I would need to cover one cushion, adding a few extra inches to be safe. Then I cut it, laid it upside down, and chose which part of the pattern would be the center of my new cushion. You can see my hand here, showing the wide blue stripe as the middle.

I removed the seat cushion from the chair frame by simply removing 4 screws. Easy.

I placed the cushion on the table, checking my fabric placement again.

I stapled the new fabric right on top of the original upholstery. I used the original staples as a guide. That part was easy. I started in the front and center and moved toward the corners, pulling the fabric tight and even as I went along.

The corners were more difficult, as I'm not a professional. I played with the folds until I found one that would work. I could pretty easily replicate this fold on all the corners. I can't really explain how I did this, but I used many staples in the corners: pull in to place, staple, move a quarter of an inch, pull into place, staple again, and so on.
After I finished stapling, I hammered the staples flat (some were sticking up a little), and then I trimmed the excess fabric.

And here's how it looked when finished. You can see that in the end, I went with the green stripe as the middle.  The corner folds aren't perfect, but I don't think they're too noticeable, either.

And here I checked to make sure that my lines were straight. The tricky part about upholstering with stripes is making sure they are perfectly straight. Remember the staple remover? Yeah, I had to pull them out and start again a few times. I did the best I could, and I'm pleased with how it turned out. :)


So there you have it, two of my newly reupholstered chairs! They feel so much fresher now.

You don't have to be a professional to do it yourself. With a little time and patience, you can save a lot of $$$!

November 18, 2013

Fun Find: Plush Pile Kid's Rug

It's really challenging sometimes to have expensive taste and a slim decorating budget. Here's my strategy: I look for products that I love from my favorite designer stores, make a mental note of the prices, and then keep an eye out for similar products with a much lower price. Sometimes I have to wait for a long time to find the right price, but when I finally find what I'm looking for, it's totally worth the wait.

Recently, I found a rug for my son's room that I've been searching for for several months now. I mean, compared to this and this, I scored a great bargain at $79 from my local warehouse club. It was the only one left, so I had to bring it home. We love it!


To make it even better, we added a thick rug pad underneath that serves three functions: (1) it prevents the rug from slipping and moving, (2) prevents the bright colors from bleeding onto the carpet, and (3) adds an extra layer of cushion for my little baby boy.


You just never know when you'll stumble upon just the right thing! :-)

You can see more of our little man's nursery here.

Have a great day!

October 21, 2013

Shopping For The Perfect Drapes

If you're like me, you want your home to feel custom but you don't want to spend a lot of money and you probably don't have a lot of time to shop around. Curtains are an easy way to add a custom feel and character to any room. Sure, you can buy generic curtains from any home store or you could be really adventurous and create your own. I fall somewhere in the middle. I love a custom look but I'm not a seamstress, so I opt to order them.

I love this company: Country Curtains. They will send swatches free of charge. They have many styles, patterns, and price points (but they tend to cater to a more traditional style). I think they are higher quality than you would find at your local home store. The best thing  is that you can have the samples (swatches) delivered to your door and all you have to do is choose the right one, measure, and place your order.  It's great to be able to feel the texture and quality of the different fabrics before placing an order. Being a busy mom now, I love the option of shopping like this without having to step foot in a store.

You can also order extra fabric if you're being really adventurous and want to have custom pillows or upholstery done to coordinate with your drapery. Lots of fun options!

I'm working on a project now and ordered a bunch of fabric samples, some of which you can see here:


All of my favorite samples went home with the homeowner so she could try them out in the space, but it won't be long before we're all done and I'll share the finished product!

Don't be afraid to play with fabrics and patterns and colors on your windows. It's not hard to find a custom look- just try a company that offers free fabric samples and extra fabric by the yard to get the ball rolling.

Happy Decorating!


October 7, 2013

Easy Fall Centerpiece

Remember this photo?
See more fall decorating here.


I have been searching for just the right arrangement for this little pumpkin basket...and I found it this weekend!


I found the flower arrangement at Target, complete with a pretty mercury-glass-looking vase for a fairly reasonable price. The best part is that it fits perfectly and it's just the right amount of orange, green, and red to make the pumpkin basket "pop".

Happy Fall!


October 6, 2013

Fun Find: Antique Vanity Tray

One Saturday morning, my husband and I decided to take our little family out to explore our town. We happened to find some adorable antique shops (which I love hunting through). And I happened upon this little vanity tray for just $10. Obviously, I had to take it home.


 So now I have a great little place to set my earrings and do-dads without cluttering the bathroom counter too much.


Definitely a fun find! :-)

Have a great day!

October 4, 2013

Fall Decorating!

Well, I figured it must be time to break out the fall decorations when I went shopping and saw all of the Christmas displays in full glory. Thus, fall has arrived at our house. I've inadvertently started a little theme with pumpkins and sunflowers, and of course, berries!

I think it's more fun decorating for the seasons with a little one in the house. New colors and textures all around! He loves it.

Fall wreath on the front door
Tutorial here.

 Who says wreaths can't be inside, too?

 I love this centerpiece. It just doesn't get old.

This new pumpkin basket needs something more, 
but I haven't figured out exactly what to put in there...yet. 

 A little splash of color on the mantle. 

I love these new lamps! Decorating this table was more fun this year. 
Finally, it seems to make sense.

I found little, fall thingymabobs at Target in the dollar bins. Score!

It's easy to change the stems in this basket to fit the season.

And we're ready for Trick-or-Treaters! The candy will NOT be opened until the 31st!
At least that's the plan...but it wouldn't hurt to have just one little bite, right? ;-)

Happy Fall!

September 26, 2013

Easy Outdoor Centerpiece

We absolutely love spending family time outside when the weather is nice. Lately, the weather has been absolutely perfect! This means that my little family has been enjoying many meals outdoors. We even drag the high chair out onto the patio. It's the only way to keep Baby Boy still long enough to eat. :-)

To enjoy the patio even more, I put this little centerpiece together for the table and we love it! Just 3 little flower pots (still filled with soil), 3 pillar candles, and some clippings from the trees in our yard. Easy as can be!


It's just a slower pace of life. No clocks. No phones. No television.
We take our time enjoying each other and the gorgeous weather.
I wouldn't have it any other way.

Have a great day!

September 17, 2013

Fun Find: Crystal Lamps

Every once in a while I find something completely by accident and can't seem to leave the store without it. This time it happened while I was shopping for bread and milk. I just happened to stroll through the furniture isle at my warehouse club and what do you know...a pair of gorgeous crystal lamps.  They were whispering for me to take them home.

So I did. :-)

To make the deal even sweeter, I sold some "junk" in the garage and completely made up for the cost of my little splurge. I love it when that happens!

Maybe someday I will feel like saying goodbye to summer and decorate for fall...but not yet!

Have a great day!

September 9, 2013

Coming Soon!

A few days ago I helped shop for (and find) an absolutely stunning sofa and recliner.

Tonight I ordered 13 different fabric swatches for choosing new curtains.

Tomorrow I am delivering an antique chair and chandelier.

This can only mean one thing...

I'm working on another room! And I'm really excited about this one...it's probably the most luxurious room I've worked on yet and it's not my house (although I wish it was)!

Stay tuned. :-)


September 7, 2013

DIY: Fall Foliage Wreath

Fall is almost here and I am looking forward to decorating!

Several years ago, I was looking for a fall wreath that I liked for under $30. Let me tell you, it's not an easy task. I couldn't find one so I made it myself.  Here's how it turned out:


You can make one, too:
I bought a plain wreath like the one below for around $6 and then found all the different types of foliage that I liked on sale. Most of the pieces ranged in price from $0.70 - $2.00. I also bought some wire specifically for making wreaths. 

There lots of different textures in my wreath. Some of the leaves, for example, are velvety soft while others are your typical silky feel. I also added several types of berries and some fruit. I think it looks more interesting with lots of colors and textures. Of course, you choose what you like best for your wreath. :-) 


  • After you have all of the materials, play with the foliage, arranging it however you prefer until you get the finished product you love. 
  • Stick the ends deep into the center of the wreath where it will be fairly secure. There is no need to glue anything permanently; that's why you have the wire. 
  • When you have finished arranging all of your "stuff" on the wreath, use the wire to wrap it in place. 
  • Weave the wire wherever you feel like more support is needed and tuck the end into the center of the wreath (so you won't get scratched later). 


It doesn't have to be pretty. Nobody will be looking at the back!  

And then it's done! Hang it up and enjoy it.

You don't have to spend a lot to have a very pretty fall wreath. If you don't use glue, you can change out the foliage whenever you please with no hassle. Easy as pie. :-)

Click the picture to find out how to make a different type of wreath:


Have a great day!


September 5, 2013

Must See: The Roxbury

We went on vacation lately and found this place to stay. It's an experience, really. You've got to see it!

Nestled in the Catskills and the small town of Roxbury, NY, this crazy awesome place looks pretty quaint from the outside...but don't let it fool you. It's anything but ordinary.


You can see the official website here.

They do a great job with the grounds. Pretty plants and flowers are everywhere! There's even a fire pit and a beautiful garden path that leads to a gazebo. 


Not only are the grounds beautiful, they are also funky and awesome. Black, white and lime green. 


Seriously, I want this furniture.


There are spaces like these, where you can just relax and socialize, scattered all around the property.


And as you walk around, you will find more little interesting details. I thought the murals were lots of fun!
(Check out the light. Yes, the place glows green at night!)


You have to forgive the quality of the next picture. I don't have a clear one, but the room was too crazy fun to be left out. How did they find yellow crystals for the lights? I personally loved that there was gourmet hot chocolate and [really good] cookies set out for guests all day in this room. Yum.


And in here, too!


We found several of these large murals painted all around the place, all with a design theme. I loved it!


This chandelier was another funky and unexpected detail. Never mind that the stairwell is shockingly green! Seriously, this place was so fun...so different...so exciting to explore.


Perhaps the best detail is that all the rooms are different. Yep. They are themed! You'll have to check out their website to see all of the rooms, but I want to share ours with you. 


My husband accused me of taking "man points" from him for having him stay in this room. What are "man points", anyway? Hey, there was a big TV mounted to the wall. That made up for the sparkles and pink. :-)


Hard to see here, but the chandelier actually had green crystals. Where did they find this stuff?!
There was a great kitchenette where Baby Boy had a blast hiding in the bottom cabinets.


Little details will make you happy at this place. They even provided some Godiva tasting squares upon our arrival. Yum.


Shimmer & sparkle overload! Fun!!


Even in the bathroom they didn't forget to leave a note framed in a fluffy, pink, bejeweled frame. Ha!
Now, the Roxbury had the most soft and fluffy towels of any hotel I've seen in a long time. Another great detail: they didn't cheap out on the TP. It's the small things, folks.


They had other great things, too...like a massive movie collection and board games of all types free to checkout for guests. Snacks galore. The friendliest staff. Even the housekeeping services were above standard. I left some baby dishes in the sink, totally planning to wash them later, and when I got back to the room that evening, they had been washed and dried for me. Now that's great service.

So if you're looking for a fun place to stay in the Catskills, a quaint NY boutique hotel, affordable rooms, fun atmosphere, and excellent service, try the Roxbury. You won't be disappointed.