Showing posts with label Hostessing. Show all posts

December 15, 2013

A Fun New Twist on an Old Kids Party Game

I randomly saw a picture of this online and decided that I had to try it when the time was right. Well, with all this Christmas partying going on, I found the opportunity and I just can't wait!

A dear friend helped me put it together and purchase all the goodies. Here's how we did it:

We used one entire roll of Scotch brand packing tape, 38.2 yards to be exact, and started taping the toys and candy together to form this giant ball:


We included prizes that wouldn't be ruined when ripping off the tape:

  • Toy trucks, cars, and tractors
  • Hair accessories
  • Candy Canes
  • Erasers
  • Sunglasses
  • Magic Washcloths
  • Jumping Frogs
  • Play-Doh
  • Stacking Crayons (with plastic shell)
  • Necklaces
  • Festive Flexible Straws
  • Flashlights
  • Toy boats
  • Rubber Duckies
  • Wacky Balls
  • Glow Sticks
  • Wind-up Toys
  • Candy on a Ring 
  • And in the center: Silly String! 


 How to Play:

You'll need music (several songs).
Have the kids sit in a circle.
When the music is playing, the kids should pass the ball around.
When the music stops, whoever has the ball may unravel as many prizes as he or she can!
When the music starts, have an adult nearby to cut the tape, fold the end (so the next kid can find it), and discard the trash.
Keep going until the ball is gone!


What I love about this is that the kids can see all the prizes, but they can't tell which ones they'll be able to get. It makes me want to be a kid again. :-)


If you try it sometime, come back and tell me how it went. Thanks!


Melt-In-Your-Mouth Sugar Cookies

My mom has made these cookies every year at Christmas for as long as I can remember and I can't tell you how fun it is to make them for my family now. They are so soft and sweet and delicious!

Ingredients: 

1 cup sugar
1 cup butter, softened
1 egg
2 heaping teaspoons vanilla
2 cups all purpose flour
1/2 teaspoon baking soda
1/2 heaping teaspoon cream of tartar

Directions: 

1. Mix sugar, butter, egg and vanilla.
2. Stir in remaining ingredients.
3. Cover and refrigerate for at least an hour.
4. Heat oven to 375 degrees.
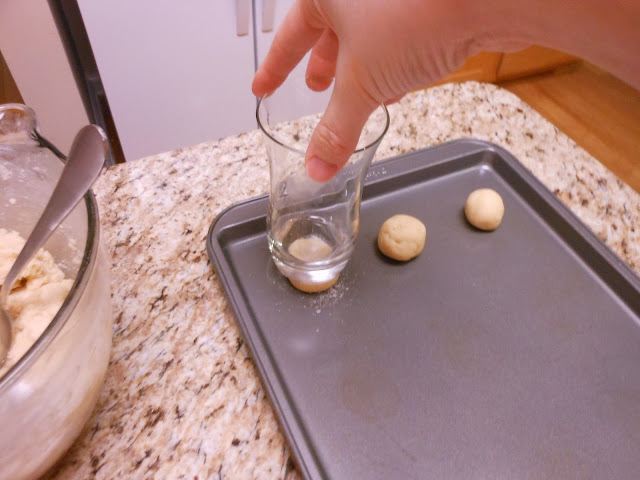
5. Shape dough into 1 inch balls and place about 2 inches apart on cookie sheet. (photos below)
6. Flatten each ball with the bottom of a glass dipped in granulated sugar. Sprinkle with colored sugar if desired.
7. Bake for 8-10 minutes (I bake mine for about 7 minutes).


 The dough should be firm when you take it out of the refrigerator.

 The bottom of the glass is dipped in sugar.

 Press gently, not too hard.

 We like to add festive and colorful sugars, too. :-)
 When they look like this, take them out of the oven and place on a cooling rack. They are fragile, so be careful not to let them crumble as you take them off the cookie sheet.


And enjoy!
Merry Christmas!

November 23, 2013

Recipe: Honey Apple Pork

I recently experimented with some pork chops, using this recipe as a guide. The reviews were great! The pork is stuffed with apples and honey, topped with brown sugar and cinnamon, and baked in a combination of apples and apple-cider vinegar. It smells heavenly and tastes just as good!

Honey Apple Pork

Ingredients: 
4 thick, defrosted port chops
2-3 apples (I used Granny Smith)
4 Tbsp honey (approx.)
3 Tbsp brown sugar (approx.)
2 Tbsp cinnamon (approx.)
3 Tbsp apple cider vinegar (approx.)

Directions:
1. Preheat oven to 350 degrees
2. On a cutting board, slice into the center of the pork chops, making sure not to cut all the way through (but deep enough to fit the apple slice).
3. Cut the apples into thin slices.
4. Place 10-12 apple slices in the bottom of your baking dish.
5. Place the pork on top of the apple slices and fill the slits with honey and at least 2 apple slices each.
6. Top with cinnamon and brown sugar to taste.
7. Pour apple cider vinegar in the bottom of the baking dish (optional). You could use some lemon-lime soda or apple cider instead of the vinegar if you prefer.
8. Bake for about 50 minutes, or until cooked thoroughly. Be careful not to overcook or it will be too dry.
9. Drizzle some of the juices and baked apples on top before serving.

Enjoy!


November 11, 2013

Recipe: Chocolate Cookie Crumb Pie Crust

Feeling Adventurous? If you'd rather not buy a pre-made cookie crust for the No Bake Peanut Butter Pie, here's a recipe to make one from scratch:

Oreo Crumb Pie Crust

20 crushed chocolate cookies (Oreos or something similar)
1/4 cup sugar
1/4 cup butter

1. Melt the butter.
2. Mix the ingredients.
3. Press firmly into a 9-inch pie plate.
4. Bake at 375 degrees for 10 minutes. Cool before adding filling.

Your pie will be extra special with a homemade crust, but it might be less expensive to buy the pre-made version. Just a thought.

Have fun!


Recipe: No Bake Peanut Butter Pie

This is my husband's all time favorite dessert. It takes about 10 minutes to throw together and tastes great!

No Bake Peanut Butter Pie

  • 1 pre-made Oreo cookie pie crust
  • 1 pkg. (8 oz.) softened cream cheese
  • 1 cup creamy peanut butter
  • 1 cup sugar
  • 2 tsp. vanilla extract
  • 1 cup Cool Whip (or heavy whipping cream)
  • approx. 1 cup Cool Whip, grated chocolate, and/or chocolate syrup for topping (optional)

To make the filling: 

1. Allow your cream cheese and Cool Whip to soften for at least 30 minutes.
2. Mix  cream cheese, peanut butter, sugar, whipping cream, and vanilla until smooth.
3. Gently pour mixture into crust.
4. Top with remaining Cool Whip. Add optional grated chocolate and/or chocolate syrup.
5. Refrigerate. For best results, refrigerate for an hour before serving.

Easy as pie! ;-)

Want to make your own crust from scratch? Click here for an easy recipe.


October 24, 2013

Recipe: Easy Chicken Pot Pie

My husband is a picky eater and I rarely find recipes that he is excited about eating. Well, this one did the trick and it made my day!

Easy Chicken Pot Pie
Prep Time: About 30 min
Baking Time: 50 min
Serves 6-8

Ingredients:
2 cans cream of chicken soup
1 1/4 cups milk
1 cup sour cream
1/4 cup chicken stock
1/4 teaspoon pepper
1 teaspoon dried parsley
1/2 teaspoon dried thyme
2-3 cups cooked, shredded or diced chicken
3 cups frozen mixed vegetables (corn, green beans and carrots), slightly thawed
3 cups southern style cubed frozen hash browns, slightly thawed
1 can (8 ounces) refrigerated crescent roll dough
Directions:
1. Cook the chicken. (I just cooked mine in a bit of olive oil and salt)
2. Start thawing 3 cups mixed veggies and 3 cups hash browns. Preheat oven to 350 degrees. 
3. While the chicken is cooking, mix soup, milk, sour cream, chicken stock, pepper, parsley, and thyme.
4. Shred or dice your cooked chicken, then add veggies, potatoes and chicken to the soup mixture.
5. Spoon it into a greased 9x13 casserole dish.  
6. Unroll the crescent roll dough. Use a pizza or pastry cutter to cut the dough into half inch pieces. Create a lattice look by laying the strips over the mixture. 
7. Bake uncovered for about 50 minutes until bubbly and golden. 
Enjoy! 


October 7, 2013

Easy Fall Centerpiece

Remember this photo?
See more fall decorating here.


I have been searching for just the right arrangement for this little pumpkin basket...and I found it this weekend!


I found the flower arrangement at Target, complete with a pretty mercury-glass-looking vase for a fairly reasonable price. The best part is that it fits perfectly and it's just the right amount of orange, green, and red to make the pumpkin basket "pop".

Happy Fall!


September 30, 2013

Recipe: Almond Sheet Cake

If you love almond flavor, you will not be able to get enough of this cake. Actually, I can't make it very often because I will eat it for breakfast, lunch, and dinner. It's SO good and SO easy!

Helpful Tip: My mom taught me that the secret to making a great cake is following the recipe exactly, adding each ingredient exactly in the order that the recipe calls for it. It will make your cake so much more moist and delicious!

Thanks to Sweet and Savory by Sarah for this recipe and photo!


To make the cake:

1 cup butter
1 cup water
2 cups flour
2 cups sugar
1 tsp. baking soda
1/2 cup sour cream
2 eggs
2 tsp. almond extract

1. Preheat oven to 375 degrees.
2. In a small sauce pan, boil the water and butter, remove from heat.
3. In a separate bowl, mix flour and sugar.
4. Pour the boiling mixture over the flour and sugar. Mix well.
5. Add baking soda, almond, sour cream, and eggs. Mix well.
6. Pour the batter into a greased 9x13" pan.
7. Bake for 20-25 minutes, or until the middle is set.
8. Allow the cake to cool completely before adding icing, about 2 hours.

To make the icing: 

1/2 cup butter
1/4 cup milk
4 cups powdered sugar
2 tsp. almond extract

1. Boil the butter and milk in a small sauce pan, remove from heat.
2. Add the powdered sugar and almond to the mixture. Mix well.
3. Pour it over the cake, as evenly as possible.

Enjoy!


September 26, 2013

Easy Outdoor Centerpiece

We absolutely love spending family time outside when the weather is nice. Lately, the weather has been absolutely perfect! This means that my little family has been enjoying many meals outdoors. We even drag the high chair out onto the patio. It's the only way to keep Baby Boy still long enough to eat. :-)

To enjoy the patio even more, I put this little centerpiece together for the table and we love it! Just 3 little flower pots (still filled with soil), 3 pillar candles, and some clippings from the trees in our yard. Easy as can be!


It's just a slower pace of life. No clocks. No phones. No television.
We take our time enjoying each other and the gorgeous weather.
I wouldn't have it any other way.

Have a great day!

September 20, 2013

Apple Crisp Oatmeal: Crock Pot Recipe

I doubt I'm alone when I say that I'm starting to look forward to (and crave) yummy fall recipes. Today I'll share one of my new favorites with you:


Image from chickfluff.org

Crock Pot Apple Crisp Oatmeal 
(serves about 6)

5 apples (I used 4 Granny Smith and 1 Red Delicious)
1/2 cup brown sugar
1 tbsp ground cinnamon
2 cups of oatmeal
4 cups water


Crumb Topping 
1 cup flour
1 cup brown sugar
1/4 tsp baking soda
1/4 tsp baking powder
1/2 cup (1 stick) butter, melted


1. Wash, peel, & slice apples and place them in the crock pot.
2. Sprinkle brown sugar and cinnamon on top of the apple slices.
3. Pour oatmeal on top, then add the water.
4. Do not stir the mixture.
5. Bake in the crock pot on high for 4.5 hours, or on low for no more than 6 hours.

6. About 30 minutes before the oatmeal is done, make the crumb topping.
7. Mix the dry ingredients (flour, baking soda, baking powder) together.
8. Add the brown sugar and melted butter.
9. Mix together with a fork until crumbly and sprinkle on top of the oatmeal mixture.
10. Allow it to bake for another 30 minutes or so and enjoy! 

Start with apples: peel, core, slice. Use your favorite flavors. This is my favorite combo. 

Add the brown sugar and cinnamon. Don't stir it up, just sprinkle on top.

After you add the oatmeal and water, it will start to bake and look like this. No need to stir.

And here it is, right before serving with the apple crisp topping added. The warm oatmeal mixture will start to bubble up through the topping when it's ready to serve. Yum! It goes great with a tall glass of milk. :-) Enjoy!


August 29, 2013

Florist For A Day

You may have figured this out by now, but I absolutely love flowers. Especially roses. The smell. The soft petals. The brilliant colors. They are on my top 10 list of my favorite of God's creations.

I recently had the honor of doing the flowers for my aunt's wedding. I've found that it's incredibly less expensive to do wedding flowers without a florist, and my aunt trusted me enough to give me the challenge. Seriously. It's an honor.

So, she ordered the bulk flowers and had them delivered to the church. We then turned the kitchen into a makeshift florist shop.

It was SO FUN!

If you are interested in doing wedding flowers yourself, you might find this post helpful.

A few things to know first:

  • You will need helpers (at least 2).
  • To keep bouquets in place, you will need to purchase corsage pins and green florist tape (find these at any craft store).
  • You will need sharp scissors and pruning shears. Key word: sharp. Have enough for you and all your helpers. Don't forget gloves if you have thorny flowers.
  • Make sure your facility has a large enough kitchen to house your makeshift florist shop (see pictures below).  Large sinks, large pots (for water & storage), large trash cans, large refrigerator, etc...


In the picture below, do you see those tall cardboard boxes on the far left? That's how roses are shipped. When they are delivered (1-2 days before the big event), the boxes must be placed in a refrigerator for preservation until you have a chance to put them in water. We put room temperature water in large pots, added the flower food, and set them in the sink. Thankfully, this church had an incredibly useful kitchen with 3 large sinks.

You will want to wear gloves when working with roses. The thorns will get you. It hurts.


The next step is to take the stems, one by one, and remove the leaves and any damaged petals from the outside of the flowers. Don't worry about removing the petals, there are plenty more that will open up beautifully in time. Have another container with room temperature water and flower food ready for the prepared stems. Then you will be ready to make the arrangements.

You really should play with some sample flowers before the big day to figure out exactly how you want your arrangements to look. Just get some cheap flowers from your local grocery store and have fun arranging them in the same vase/container that you plan to use at the event. When you purchase your bulk flowers, you will have an idea of how many stems you will need based on your sample. Remember to buy plenty of filler, like Baby's Breath, for example.  You can see in the picture below that we used small vases and put 5 roses in each vase, using the Baby's Breath and greenery to make it full and keep the flowers in place.

We finished the centerpiece flowers two days before the wedding and put them back in the refrigerator to keep until the big day. It's really not difficult and will cost you about 1/5th of the cost of hiring a florist. I did it for my wedding and I don't regret it for a minute. It's the only way I could afford having hundreds and hundreds of roses.
If you look on the bottom shelf of the fridge, ^ you can see the large pot full of stems we were saving for the bouquets.

To make a bouquet, start by placing three flowers in a triangular shape and wrap the stems with the florist tape to keep them in place. Then add flowers around that. Tape them in place. It's like adding one layer at a time. You can make your bouquet as loose or tight as you'd like, but I have found that wrapping tighter keeps the flowers in place better. Keep adding flowers around the bouquet until you get the look you want. To finish off, add some greenery around the stems and wrap them together with florist tape. The length of the stems where your hands will touch the bouquet should be wrapped in florist tape.  Use a corsage pin to hold the end of the tape in place. Cut the stems to be level and you're done!

This is how some of the bridesmaids' bouquets turned out. Behind them you can see the larger arrangements that we placed at the altar.


And this was the bride's bouquet. I think we used 4 different types of roses and 2 fillers, around 3 dozen roses!


And I loved the vases. We added some "bling" using a product called Bling on a String and hot glue.

So there you have it: DIY wedding flowers for a fraction of the cost.


Have a great day!

August 21, 2013

Baby Boy's First Birthday!

We celebrated one year with our Bundle of Joy this summer. I still can't believe how fast the first year went by!

Anyway, I wanted to have a themed party that was cute, cheap and fun but not overdone. You know what I mean? I browsed Pinterest, like any mom would do for ideas...
And here's how it turned out:

Baby Boy loves The Very Hungry Caterpillar by Eric Carle (who doesn't?) and the theme was born. I made the caterpillar using a few sheets of scrapbook paper. I used a bowl to trace the circles and used the book's cover as a guide to finish him off.

My sister gave us a wonderful photo shoot (lots of balloons involved) and I was able to reuse the balloons for this! So fun!


I just so happened to have this little jar...so I had to make another caterpillar friend for the table. Find the directions here.

Since the party was small (just us, grandparents, and one uncle), we had foods that the grown ups would enjoy, but also that fit the theme. I tried to incorporate foods from the book, thus the watermelon, "green leaf" salad with apples, berries, candied nuts and strawberry dressing, and then some crackers, meats and cheese. It was tasty.

Call me old fashioned, but I really wanted to make the cake myself. Sure, it would have been prettier coming from a bakery (and I have some friends who put me to SHAME), but I remember how much I loved my mom's homemade birthday cakes. They were so special, made just for me. And I want to continue that tradition with my son. Behold: the (cup)cake(s).
Maybe I'll aim for something more challenging on next year's cake...


So there you have it! We had a blast. :-)

March 5, 2013

Tea, anyone?

Naturally, after spending several years of my childhood in England, I developed a love of fine china, true antiques, and tea cups. Sometimes I have the worst craving for a proper scone topped with clotted cream and strawberry jam. Sigh. Today is one of those days.

Anyway, I've been collecting teacups since I got married (they remind me of England).

On the tray you can see three different teacup styles. The blue one is your standard English size, the white one is French, and the little pink one is Japanese. The teapot is American made and also happens to be part of my wedding china.


Here is my newest addition:

The blue goes perfectly with subtle blue accents in my dining room. So pretty!

And I absolutely love this little display rack. When I need a bit of a change, I just switch out the teacups for a new look.


Here's a fun way that my mom added to my collection: 


Measuring cups! Fun, right? 

Even more fun than displaying the pretty china is using them with friends who enjoy a good cup of English tea. :-) 

Have a great day!

February 21, 2013

Hostessing: Feeding a Crowd

Over the past few years, I have become accustomed to having 15-20 people in my home for a meal at once. It's common for churches in my area to have small groups that meet in people's homes, and we often host these events. When I first started making these large meals, I had a hard time figuring out how to feed so many people without (1) spending a lot and (2) having enough so everybody was full.  These meals are informal and I have found that buffet style works best for my house. I've compiled a list of simple and inexpensive meal ideas that I've tried and found successful.


Main Dishes
1. Mini Sub Sandwiches
  • Make sure to have a choice of meats and cheeses (at least two) and common toppings/condiments. I like to have most of these: lettuce, pickles, black olives (my favorite), onions, mustard, miracle whip, & ranch. 
  • You can buy bulk sub rolls at a warehouse club or even at your local Walmart. If they are too big, just cut them in half. 
2. Baked Potato Bar 
  • Plan to bake your potatoes at least three hours before guests are to arrive if you will have to make two batches. If they finish baking early, make sure to cover them with foil to keep them warm. Baked Potatoes usually hold their warmth for a while, so if they come out of the oven a little early it will be ok.  
  • You'll want to provide plenty of toppings like butter, sour cream, shredded cheddar, bacon bits, & green onions.
  • These have a delicious sauce that you can choose to put on top, but I usually just put it inside the sandwiches.
4. Sloppy Joes 
  • My sloppy joe recipe is simple: brown as much hamburger as you will need (1 pound makes enough for about 5 sandwiches). After you've drained the grease, add equal parts ketchup and BBQ sauce and a dash of chili powder. You can even add a teaspoon of Honey Dijon mustard and/or diced onion for some extra flavor. Just mix it all up, adding ketchup and BBQ sauce until you get the consistency and flavor you like.
5. Tomato Soup & Grilled Cheese Sandwiches
  • Buy canned tomato soup and add milk instead of water to make it creamy. The more soup you make, the more milk you will need to have on hand. 
  • Use a large griddle to make up to 8 grilled cheese sandwiches at once. You can even slice your sandwiches in 4 vertical strips, easy for dipping.
6. Fettuccine or Spaghetti
  • Just remember that you will need more sauce than you might think because a large batch of pasta sucks up the moisture in the sauce quickly. You don't want to serve your crowd dry noodles. 
7. Wraps
  • These are great in the summer! You can play with the filling to make it your own. 
8. Taco Bar or Cheesy Enchiladas
  • A taco bar is simple, just have your toppings ready and serve the meat and tortillas warm. 
  • You don't need much for enchiladas- I just stuff mine with chicken or beef, cheese, and a bit of enchilada sauce. Pour more sauce and cheese over the top before baking. You could even add black olives and/or green onions on top. Find the recipe on the can of enchilada sauce.

Can't Go Wrong Side Dishes:
  • Potato Chips (SunChips are tasty and a little more healthy than your average chip)
  • Salad (Try different/seasonal toppings like cranberries, strawberries, candied nuts, etc.)
  • Baked Beans (I like to buy canned baked beans and add a bit of smokehouse BBQ sauce for flavor)
  • Assortment of Fresh Fruit (pair this with spring/summer foods like sandwiches or wraps)

Easy To Please Desserts:


If you have other ideas for simple and inexpensive ways to feed a crowd, feel free to share! I'm always looking for new ideas. 

February 11, 2013

Hostessing: Guests & Bathrooms

Bathrooms are a big deal.

Great design is not just pretty to look at, but functional at the same time. I like to keep a few extra toiletries on hand in case my overnight guests forget something: cotton balls, cotton swabs, a toothbrush, toothpaste and shampoo. I put the freebie toothbrushes and toothpaste from the dentist into my guest stash. Hotel shampoo samples are also handy (as long as they smell good). 

Here's a pretty way to display supplies on a small bathroom counter.
Guests don't want to rummage through your cabinets to find what they need, 
so making supplies easily accessible will make them feel more comfortable.

I found those little canisters at Home Goods for just a few dollars.
The silk peony is simple and timeless. Who doesn't love a peony?
It rests in a not-so-elegant bud vase that does the job.

A list of things that should be in plain view for every bathroom that guests may use:

Plenty of hand soap
A clean hand towel
A trash can
A plunger
Tissues
Extra toilet paper
Air freshener spray

That's all you need in the loo for comfortable and happy house guests...


My house guests have had to trip over rubber duckies and baby bath supplies lately, 
but at least the bathroom is clean! After all, isn't that what is most important? :-)

For thrifty bathroom design ideas, click here.


February 7, 2013

Itty-Bitty Powder Room

We have a very small half bath that was as plain as you could imagine. It's so small that it actually fits under the stairs. Combine the tiny space with off-white walls, builder grade mirror, ugly faucet, etc. and you have one boring room.  And that was the bathroom that our guests most frequently use. I had been itching to fix it up somehow, but had a hard time imagining what could be done with such a small space.  After my son was born, I thought it was time to fix it up...finally.


We saved some money by using leftover paint from the living room. 
Since it's such a tiny space, I only needed a half gallon. 
We replaced the ugly faucet with this affordable, contemporary version.
I am a fan of feature walls. I left one of the walls the original color and added a fabulous decal from my favorite decal company. See a close-up below: 

 I would definitely recommend doing business with this company. 
They were able to adjust the size and color for me with no hassle. 


 The ceiling in this room looks good with contrasting colors.


For storage, I added this wicker magazine rack. One side holds magazines, the other holds extra supplies. Nothing is worse than going to someone else's house and running out of T.P., so I always have plenty.


  I got rid of the builder grade, non-framed mirror that was here before and replaced it with this one that I found on Craigslist for $25. It was gold when I got it, but a quick spray paint job fixed that.
And to make it even sweeter, I sold my builder grade mirror on Craigslist for $15! 

I love the detail on this mirror!

When looking for used items for your home, especially frames, pay attention to the shape more than the color. The color is easy to change, but great detail will cost you more if you buy new. 

If you spray paint a mirror, have a razor blade handy to scrape any extra paint off the mirror surface. Make sure you keep the blade flat so you don't scratch the glass. 


I found the shelf at my local home improvement store for $16.
 It works well for a little bit of storage and some decorative touches. 
Very easy to install: just need a drill, a level and about 10 minutes.
And one little change that has nothing to do with decor, but everything to do with function- we added a slow close seat to the toilet. No more banging. Yes!


So that's a very inexpensive way to refresh a tiny bathroom.
 It's simple.
 It's clean.
 It's neutral. 
It serves it's purpose without being too boring. 
And we like it. :-)